DOF

This is the acronym of “Depth Of Field“. I have been usually using this word in my blog, giving sometimes a brief description about it. But in today post, I am going to talk a little more about this topic in relation with my experience using different digital cameras.

I bought my 1st camera on April , 2004. It was a Canon Ixus 400. The Ixus belonged to a Canon compact series with a slim body, with great quality for a point-and-shot camera, but with so few manual settings. After breaking the LCD of this camera, I changed to a Panasonic DMC-FX9. I was less happy with this camera ‘cos it had 6 MPixels vs. 4 MP of the old Canon, but it provided less details and more noise. In 2007, I began to take photography more seriously and changed to a ‘bridge camera‘, the Sony DSC-H5. This camera included manual and semi-automatic modes and provided a bigger zoom. In 2008, I went on holidays to Miami (USA), with the idea of buying a Canon EOS 450D due to the high euro/dollar ratio, but I bought it finally in Spain through a website due to the limited warranty to USA. The change to a DSRL with an APS-C sensor was the way to a new world of sharpness and digital edition in RAW, and more flexibility with lenses and creativity using my dear Sigma 10-20mm wide angle lens for architectural and landscape photography. Finally, this year, I have recently bought a full frame camera, the Canon EOS 5D Mark III, and a new era for control of focus, more sharpness, and high ISO settings has begun for me ….

Now, you can be asking why I have described you my old cameras and some of the decisions that I took for buying them, if I am talking about DOF. So simple, you are going to discover it in the following paragraphs.

Depth of field (DOF) , as a definition, is the distance between the nearest and farthest objects in a scene that appear acceptably sharp in an image.

The DOF depends on several factors:
– Aperture
– Focal Length
– Sensor size or ‘cropped factor’ (in relation with full frame camera sensors, 24 x 36 mm)
– Subject distance

The aperture is usually specified with the f-number, the ratio of lens focal length to aperture diameter. Reducing the aperture diameter (increasing the f-number) increases the DOF. So you are wondering, why you shoot a lot of your pictures with f/11 , if the maximum f-number in your lenses is usually f/22 ? Due to a problem called diffraction, that occurs in camera when you increase you f-number, reducing the amount of light transmitted and the the sharpness in the image borders. f/11 is an usual value for what we can call ‘critical aperture’. The critical aperture is the optimal f-number value or values for which you obtain overall sharpness (including the extremes and center of the picture), avoiding defocus and diffraction. So as you are seeing here the practical use of the aperture depends on the amount of sharpness or blur that you need or want for creative effects in your composition, but taking into account the optics defects. If you want so little DOF, just only to get the subject in focus, for example for portrait photography, you should use your lens ‘wide open’ with f-number bellow f/5.6, usually f/2.8 or less. For landscape photography as you want to get all in focus, sharpness from the foreground to infinity, you should use f/13, f/16 … but if you can , don’t go to more ‘cos you will have blur in the extremes due to diffraction.

The focal length also controls the DOF. With telephoto lenses (long focal lengths) , you reduce the DOF. This is the reason to use them in portraits, to get only in focus your subject or part. And with wide angle lenses (short focal lengths), you increase DOF, being the most useful lenses for landscape and architectural photography.

DOF is, to a first approximation, inversely proportional to format size. I am going to explain this firstly with cropped format DSRL ( e.g APS-C cameras with a 1.5 for Nikon or 1.6 for Canon sensor size ratio). These APS.-C camera systems allow using many of the same lenses on both full-frame and “cropped format” cameras.. If pictures are taken from the same distance using the same f-number, same focal length, and the final images are the same size, the smaller format has less DOF. If pictures taken from the same subject distance using the same focal length, are given the same enlargement, both final images will have the same DOF. The pictures from the two formats will differ because of the different angles of view. If the larger format is cropped to the captured area of the smaller format, the final images will have the same angle of view. So as consequence, if you compare with compact camera where sensor size is still smaller, you will discover why you usually have overall image in focus with your compact camera and your are so happy with your landscape photography, although your camera exif data said that the picture was taken with f/5.6 or less, but you are angry cos you can’t get the bokeh ( blur in background) that get the photographers that shoot your favorite model.

The subject distance is very critical when you are very close to your subject, reducing the DOF. I have discovered after using several cameras , that it is specially critical with Full-Frame cameras and you should consider specially where you are focusing with your camera in interiors with low f-number although you were using wide angle lenses. So in order to solve this problems, it is useful to consider the use of hyper focal distance.The hyperfocal distance is the nearest focus distance at which the DOF extends to infinity, focusing the camera at the hyperfocal distance results in the largest possible depth of field for a given f-number.

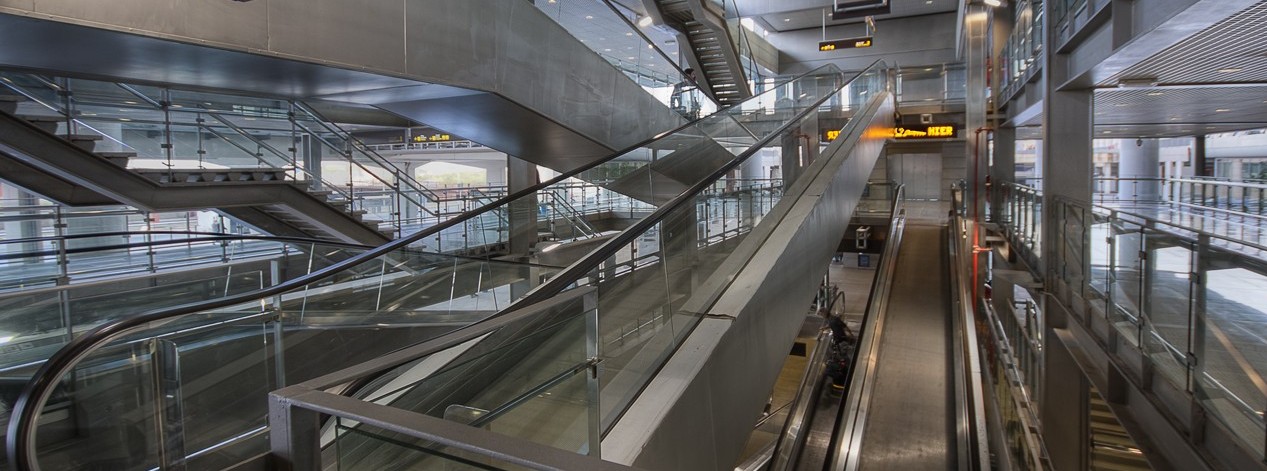
The image posted shows how the DOF is extended from a few meters to infinity, but some part of the image is defocus, the tiles on the right side, due to the short f-number, f/4.

Way To Entry :: HDR :: DRI

Estación Fantasma, Metro Chamberí , Madrid (Spain).

Canon EOS 5D Mark III | Canon EF 17-40mm f/4L USM @ 17 mm | f/4, 1/30 s, ISO 3200.HDR/DRI from 3 handheld exposures @ [-3 EV .. 0 .. +3 EV ]

ISO 12800

ISO 12800 is not the name of a new sci-fi film directed by George Lucas like his first movie THX 1138. In fact, THX was the name of a new generation surround sound, developed by a George Lucas company, that nowadays we all hear in the cinemas. And if you don’t know, maybe we make HDR due to another product developed by a George Lucas Co, ILM. Industrial Light & Magic (ILM) is an American Academy Award-winning motion picture visual effects company that was founded on May 1975. And in 2000, ILM created the OpenEXR format for High Dynamic Range Imaging. This is the 32-bit file format that I use to save my HDR files before tonemapping.

Coming back to the post title, when we talk in photography about ISO, we are referring to one of the 3 exposure parameters (Exposure Triangle): aperture, time and ISO. This means that we can get the same exposure, changing these parameters. As an example, the combinations: aperture f/11, time 1/15s, ISO 12800 ; f/8, 1/30s, ISO 12800 or f/11 1/30s ISO 6400 produce the same exposure but not the same image. And you are wondering why ?

Each change of one of these parameters need a change for 2 other ones. But each parameter has its effect on the image:

ISO: In traditional film photography, ISO was the indication of how sensitive a film was to light. In Digital Photography, ISO measures the sensitivity of the image sensor. The same principles apply as in film photography – the lower the number the less sensitive your camera is to light and less grainy.

Aperture: It is measure with diaphragm diagonal with f-stop number. High f-stop numbers mean narrow aperture and as consequence less light. The aperture is basically the parameter that change the Depth Of Field (DOF).

Time: It is measure in seconds or fractions of. It is basically used to control the sense of motion in the pictures.

But why 12800 ? Because it’s a high ISO number. And Higher ISO settings are generally used in darker situations to get faster shutter speeds and avoid camera shake. This is one of the reasons to change to a Full-Frame camera like Canon EOS 5D mark III. There are sites like the cathedral in this post image where tripods are not permitted, so the only possibility to get images sharp is to increase ISO. But High ISO means so much noise. About that, I can say that I am very happy with the behaviour of the 5D mark III at high ISOs. The images are fully usable for large prints at ISO 3200 and they are useful for middle-res at ISO 12800. In fact, if you check for reviews and comparisons of this camera with Nikon D800, you will see that 5D mark III wins D800 quality and sharpness, when ISO is higher than 800.

Woman Praying At Almudena Cathedral :: HDR :: DRI

Catedral de la Almudena, Madrid (Spain).

Canon EOS 5D Mark III | Canon EF 17-40mm f/4L USM @ 17 mm | f/11, 1/15s, ISO 12800.HDR/DRI from 3 handheld exposures @ [-2 EV .. 0 .. +2 EV ]

Night and Day Long Exposures

We always like when we see a picture with clouds motion in the sky and the blur effect due to long exposure times. This gives a surrealistic touch to the images. But the question for common people is how a photographer gets this effect.

The approach depends on the time hour, if it is near night or if we are in the midday or not near to dawn or after twilight.

During the day, to increase the exposure time it is necessary to decrease ISO (but this can be only done in some professional cameras and only 1 step, from ISO 100 to ISO 50). Or another solution it is to use small apertures (around f/22). But it is usual that although the diaphragm is very close, the estimated time for the exposure was not sufficiently long. So the solution is to use what photographers call Neutral Density filters (ND).

The ND filters rise the time exposure by several stops ( a stop is the halving or doubling of the amount of light availables and means double exposure or as consequence double time for exposure). So it is usual to select one depending on the time requested or effect in the sky (if for example there is so few wind, we will need a ND with more stops). The usual filters and their stops increase are:

· ND2 (or ND0.3) : 1 stop
· ND4 (or ND0.6): 2 stops
· ND8 (or ND0.9): 3 stops
· ND400 : 8 2/3 stops
· ND1000 : 10 stops

So that means that when you use a NDx filter, x is equal to time multiplier ( that is 2 ^ stop), the time for the exposure will be the exposure reads by camera meter without filter multiply by x. It is usual to measure exposure without filter, due to 3 reasons:

– The use of ND filters produces warm or cold hues and changes your White Balance. So if you want to use the appropriate WB, you need the camera metering without filter to set it later in your RAW editor. Although, you sometimes prefer the colors created with the filter.

– As the filter is so dark ( e.g ND400, ND1000) the camera has not light to calculate an exposure time. So in Bulb mode, you manually select the time.

– Due to the same problem, the camera can’t focus automatically.

How you are seeing, for long exposures (time > 30 s), you need to set you camera as follow:

– Set Bulb Mode ( because you time is > 30 s and other modes don’t support this).
– Use low ISO to avoid noise due to long exposure.
– Use a remote control to release the shot in order to avoid camera shake.
– Pre-focus without filter or use manual focus.
– And of course, to use a tripod or put the camera in a fixed surface.

Clouds Vanishing On Arganzuela Footbridge

Clouds Vanishing On Arganzuela Footbridge :: BW

Manzanares riverside, Madrid (Spain).

Canon EOS 5D Mark III | Canon EF 17-40mm f/4L USM + Hoya ND400 @ 19 mm | f/22, 33 s, ISO 100. BW from 1 exposures on a tripod

But during the night they are more problems to get a correct exposure. Then, You don’t need the use of ND filters but you should take into account:

– As it is so dark, the camera again has problems to focus, but now you can’t usually focus automatically (or pre-focus) as during the day. So you can use Live View Mode to select manually the focus distance, with the help of a lantern e.g. or use what it is called hyperfocal distance ( in a short-hand, it is the distance to focus for the best sharpness, widest deep-of-field, DOF). The hyperfocal distance depends on your DSRL type sensor (Full-Frame or APS-C), lens focal length and aperture. You can get tables to calculate it.

– And again, due to you have so few light, you need to set manually your time exposure. But now, the solution to calculate the time is to increase ISO and/or increase aperture (decrease f-stop number) and to take the time measure with AV mode and later adapt it for the aperture and ISO that you want or need to select with the Bulb mode. So each increment in ISO ( for example ISO 100, 200, 400) means double time. And each f-stop decrement (for example f/11, f/8, f/5.6, f/4 …) does the same.

Moonlit At Juan Carlos I Park

Moonlit At Juan Carlos I Park :: HDR :: DRI

North Pond, Juan Carlos I Park, Madrid (Spain).

Canon EOS 450D | Sigma 10-20mm f4-5.6 DC EX HSM @ 11 mm | f8, 26s, ISO 100. HDR/DRI from 3 exposures on a stable surface @ [-2 EV .. 0 .. +2 EV ]

Now, you are thinking, this is more to calculate, I am not a mathematics … what I do to simplify this ? I am going to get you several tips:

• When I used my Canon EOS 450D (APS-C) and Sigma 10-20mm lens @ 10mm, I adapted the hyperfocal distance to a visible mark in the focus ring (usually 3 fts), so then my aperture was conditioned to f/4 or f/5.6 , I don’t remember exactly. So you can do similarly in you workflow.

• To use Photopills or a similar software with calculators for your mobile. With Photopills you have hyperfocals calculator, Exposures calculator (for ND filters) and more, but this will be a topic for another post.

Hyperfocal Distance Calculator

Exposure Calculator

Canon’s HDR In-Camera Review

After several years waiting for the Canon 5D Mark II’s successor, the last year it appeared the mark III. The substitute camera has enhanced Focus System, Video and fps, and more things… They have been included new features as in-camera multi-exposures and an HDR Mode too. So if you don’t know, cos you don’t follow me on Facebook, this is my new camera.

I am going to preliminary review (less than 10 days with my new toy) the HDR in-camera.

How to use HDR with Canon 5D Mark III:

The EOS 5D Mark III has a new button on the left-rear of the camera, called the ‘Creative Photo’. Marked with an icon of a paintbrush, it’s a short-cut to three commands related to image control on the EOS 5D Mark III: Picture Style, Multi-exposure mode, and HDR mode. Pressing this button, scrolling to the HDR icon and pressing the SET button instantly brings-up the full HDR Mode menu.

Another option is to select AEB in the shooting menu. Then, they are until 7 exposures available for shooting, more than 3 for HDR mode, but the camera doesn’t generate an HDR picture. Just let you to process the files later using third-party HDR software. HDR Mode shooting cannot be combined with BULB mode, so you need to set manually the exposures or do it automatically using SW like Magic Lantern or hardware like Promote Control.

Or you can select HDR Mode in the camera’s Shooting Menu > Select Bracketing to +-1/+-2/+-3 are available(-+2 by default).And an AUTO option,when the camera reads dynamic range and on its own makes a determination of the exposure compensation needed for three bracketed shots > Choose the Image Effect that you want in the finished picture ( I select ‘Natural‘ by default) > Select Continuous HDR if you want to have several HDRs, not only one (‘1 Shot On‘ option enable).

Another settings are:

– Select your camera to save files as RAW without compression.
– Set Aperture Priority Mode.
– Set other parameters in the camera like ISO or aperture as you wish.I usually select AUTO ISO for handheld exposures.The camera has the ability to automatically select the slowest shutter speed used before it starts increasing ISO in AUTO ISO mode and it does this based on your focal length.I select ISO 100 when I have the camera on a tripod.

The camera captures 3 consecutive shots at a fast fps rate (+2 EV , 0EV , -2 EV with default settings) and generates a JPG file with the processed HDR image. The camera software aligns the images (with Auto Image Align menu option activated), but doesn’t resolve ‘ghosting effect‘ due to objects in motion in the scene.The final HDR image has slight even if there was essentially no camera shake or movement during the bracketed shooting sequence.

Finally, we can compare the results of HDR images generated by the camera and another ones processed using Lightroom, Photomatix and Photoshop. The Canon HDR images have blue hues and more cropping than the processed HDR images. The shots were taken with Auto White Balance, so I think that if you compensate it in the camera you can get a best result. I corrected WB in Lightroom previously to HDR processing in Photomatix. Besides, I processed lens corrections ( chromatic aberration and lens distortion ) in LR5 Beta. Saving the exposures with LR presets as TIFF 16-bit files. To generate an EXR file, I used HDR Pro in Photoshop, selecting 32-bit mode and to avoid disalignment, choose the 0 EV exposure to avoid ghosting and correct camera shake for the hand-held exposures.

In conclusion, HDR mode in camera is useful to have an idea of how will be your HDR image and to know if you exposures cover all the dynamic range of the scene, but the cropping inside the camera, the problem with alignment and ‘ghosting’ do that it will be better to process yourself the images.

Tanusha Moored To Benabola Dock

HDR In-camera Version:

Tonemapped Version:

Tanusha Moored To Benabola Dock :: HDR :: DRI

Puerto Banús, Marbella (Spain)

Canon EOS 5D Mark III | Canon EF 17-40mm f/4L USM @ 17 mm | f/11, 1/125s, ISO 3200.HDR/DRI from 3 handheld exposures @ [-2 EV .. 0 .. +2 EV ]

A Lambo Gallardo At Banús

HDR In-camera Version:

Tonemapped Version:

A Lambo Gallardo At Banús :: HDR :: DRI

Canon EOS 5D Mark III | Canon EF 17-40mm f/4L USM @ 17 mm | f/11, 1/125s, ISO 400.HDR/DRI from 3 handheld exposures @ [-2 EV .. 0 .. +2 EV ]